
Setting up your Virtual Private Cloud
21.08.2018, last updated 05.03.2021 - Jeremy T. Bouse - ~7 Minutes
If you’ve already followed along from my earlier posts on getting started with AWS and my update to getting started, then by now you should have a multi-tiered VPC across multiple Availability Zones which is setup along the lines that the diagram below displays.
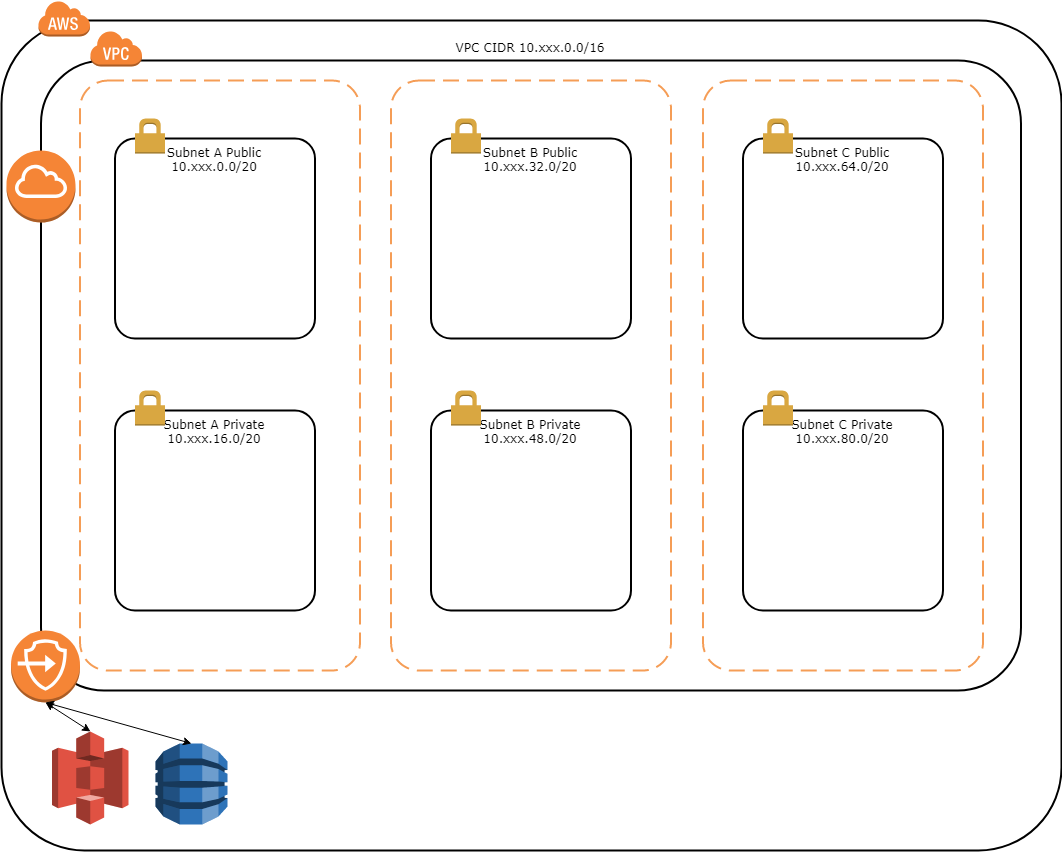
Your VPC will have a single Internet Gateway and 2 Gateway Endpoints going to S3 and DynamoDB. Each of the subnets will also have their own Route Table which establishes the routes available from within the subnet. The Public Route Tables will each have 2 routes, one for the VPC CIDR to route locally and one for the default route (0.0.0.0/0) to go through the Internet Gateway. This allows your Public subnets to be able to route out to the Internet and reach other instances within the VPC itself. Of course to route out to the Internet any instances would require a public IP address which are not assigned by default with the VPC template. The Private Route Tables will each have 3 routes, the first as with the Public Route Tables is for the VPC CIDR to route locally and the others are the Gateway Endpoints for S3 and DynamoDB. At this point the Private subnets can only reach other instances within the VPC, S3 and DynamoDB. Now let’s pick up from here and finish preparing these Private subnets to be of some use. As I mentioned previously, we have 2 choices here for Private Subnets to have Internet access. We’re not going to be providing instance within these subnets public IP addresses that can route the Internet, so we either need to setup NAT Gateways or we need to establish a VPN Connection to route over that would then NAT the traffic out to the Internet.
The first option is going with NAT Gateways placed in the Public subnets, although to remove having a single point of failure in your AWS environment you would need to provide one in each Availability Zone. The NAT Gateway is deployed into the Public subnet for a given AZ which gets a static Elastic IP address and then is able to route traffic from the Private subnet once the route is added to the Route Table for the subnet. This is all done with the vpc/vpc-nat-gateway.yaml template in my aws-infra-templates repository so setting it up is as easy as using the template to create multiple CloudFormation stacks as you provide the different SubnetZone parameter for each stack. At the time of this posting the NAT Gateways run between 0.045 and 0.093 USD per hour depending on which AWS Region it is deployed into which gives you a run rate of between 33.48 and 69.19 USD for a 31-day month for each NAT Gateway.
The NAT Gateway template is relatively simple requiring only a single parameter beyond the VPC stack name and optional alert stack name. That parameter is the SubnetZone parameter which determines which AZ the NAT Gateway is deployed into. If you had 2 AZs then you would want to create 2 stacks using a common naming schema like vpc-nat-gateway-a and vpc-nat-gateway-b to help identify which was which. Repeat if you had 3 or 4 AZs in your VPC by creating additional stacks. Once launched the template will reserve and EIP to be used by the NAT Gateway, instantiate the NAT Gateway itself in the Public subnet with the EIP allocated and setup the default route in the Private subnet route table out the NAT Gateway. The IP address is then added to the Outputs in the event you need to whitelist it with networks your servers inside the Private subnet may communicate with.
The second option is going with a VPN Connection to your on-premise location. This has the added requirement that you have the proper equipment to terminate the ipsec.1 VPN tunnel connection, but it also has the advantage that it means traffic goes out just like your on-premise network devices and your on-premise servers can communicate with your VPC instances with the proper security group rules. This can be done with the vpc/vpc-vpn-gateway.yaml template in my aws-infra repository creating a single CloudFormation stack and providing your VPN devices public IP address as the RemoteVpnDeviceIP parameter and setting the RemoteNetworkCidr parameter to 0.0.0.0/0 for the stack. At the time of this posting the VPN Connections run between 0.048 and 0.065 USD per hour depending on the AWS Region giving you a run rate of between 35.71 and 48.36 USD for a 31-day month. As the VPN Connection can be utilized from all AZs you only need one connection instead of one per AZ like you do with NAT Gateways which dramatically reduces your cost.
The VPN Gateway template requires a few more parameters to be provided than the NAT Gateway. The first being how many AZs your VPC has in it. This is required as Conditions in CloudFormation can not be based on values imported from another stack. We can chalk this up to one of the shortcomings of CloudFormation. The next two parameters are the IP address of your VPN device and the CIDR to route through the VPN connection. As we’re going to be using this as the default route we’ll want to provide it 0.0.0.0/0 but if you had NAT Gateways already you could also use this template to establish a connection between your on-premise network and your VPC by providing the CIDR of your on-premise network. The rest of the work done by the template is to setup the route to the remote CIDR your provided in the Private route tables for each of your AZs through the VPN gateway. It also sets up a route in the Public subnet route tables back to your VPN device. In my experience this was required when setting up the SLA monitor on my Cisco ASA to ensure traffic was routed back over the VPN connection.
To configure your side of the VPN connection you then have to go to the console and download the configuration template from AWS and deploy to your VPN device. I was able to follow the template provided pretty much verbatim, but I did have to make some modifications as I had multiple VLANs that I wanted to allow traffic to flow between the VPC and the NAT configuration to route out. Most of those changes were related to either ACL filters or NAT configurations on my ASA following the examples in the template but going into it in depth here is beyond the scope of this post.
Each option has both pros and cons so you have to look at which is best for your environment. In my case I decided to go with the VPN Connection terminated to my Cisco ASA firewall that my on-premise network sits behind. This allowed me to NAT the AWS Private subnet traffic out to the Internet just like my on-premise DMZ network traffic and allowed for communication between my DMZ and the AWS VPC. It also kept my monthly costs down as I only needed to pay for the single VPN Connection instead of 3 NAT Gateways. Most of my instances being deployed into the Private subnet only really need to reach out to the Internet on startup to deploy software necessary to run, then once bootstrapped all the traffic is maintained within the VPC and external access to the services provided comes in over an Application Load Balancer (ALB) deployed in the Public subnets.
At this point we should have our VPC ready to begin deploying resources into it so in my next post I’ll begin with deploying an Elastic Container Service (ECS) cluster with an Elastic File System (EFS) shared between the cluster instances. We’ll then move on to deploying some applications into that ECS cluster.