
It’s Just a Matter of Time
12.04.2021, last updated 20.10.2021 - Jeremy T. Bouse - ~15 Minutes
Let’s go back in time
 Back in August of 2016, I had built my original NTP server with a Raspberry Pi 2 that I had purchased
at my local MicroCenter. I had then ordered the original Adafruit Ultimate GPS HAT from
Amazon, along with an RF adapter cable that I later determined was the incorrect one I needed and had
to find a way to workaround.
Back in August of 2016, I had built my original NTP server with a Raspberry Pi 2 that I had purchased
at my local MicroCenter. I had then ordered the original Adafruit Ultimate GPS HAT from
Amazon, along with an RF adapter cable that I later determined was the incorrect one I needed and had
to find a way to workaround.
 This was my first time soldering a 2x20 header, so it was not the best job, and I think it may
have contributed to some of the performance issues I encountered with the project. There was some
general instability that would require me to reboot the system to reset the board routinely. The
other factor was that the default NTP daemon package available with that version of Raspberry Pi OS,
called Raspbian at the time but has since been renamed, did not support the GPS NMEA reference clock
needed to use the Ultimate GPS HAT.
This was my first time soldering a 2x20 header, so it was not the best job, and I think it may
have contributed to some of the performance issues I encountered with the project. There was some
general instability that would require me to reboot the system to reset the board routinely. The
other factor was that the default NTP daemon package available with that version of Raspberry Pi OS,
called Raspbian at the time but has since been renamed, did not support the GPS NMEA reference clock
needed to use the Ultimate GPS HAT.
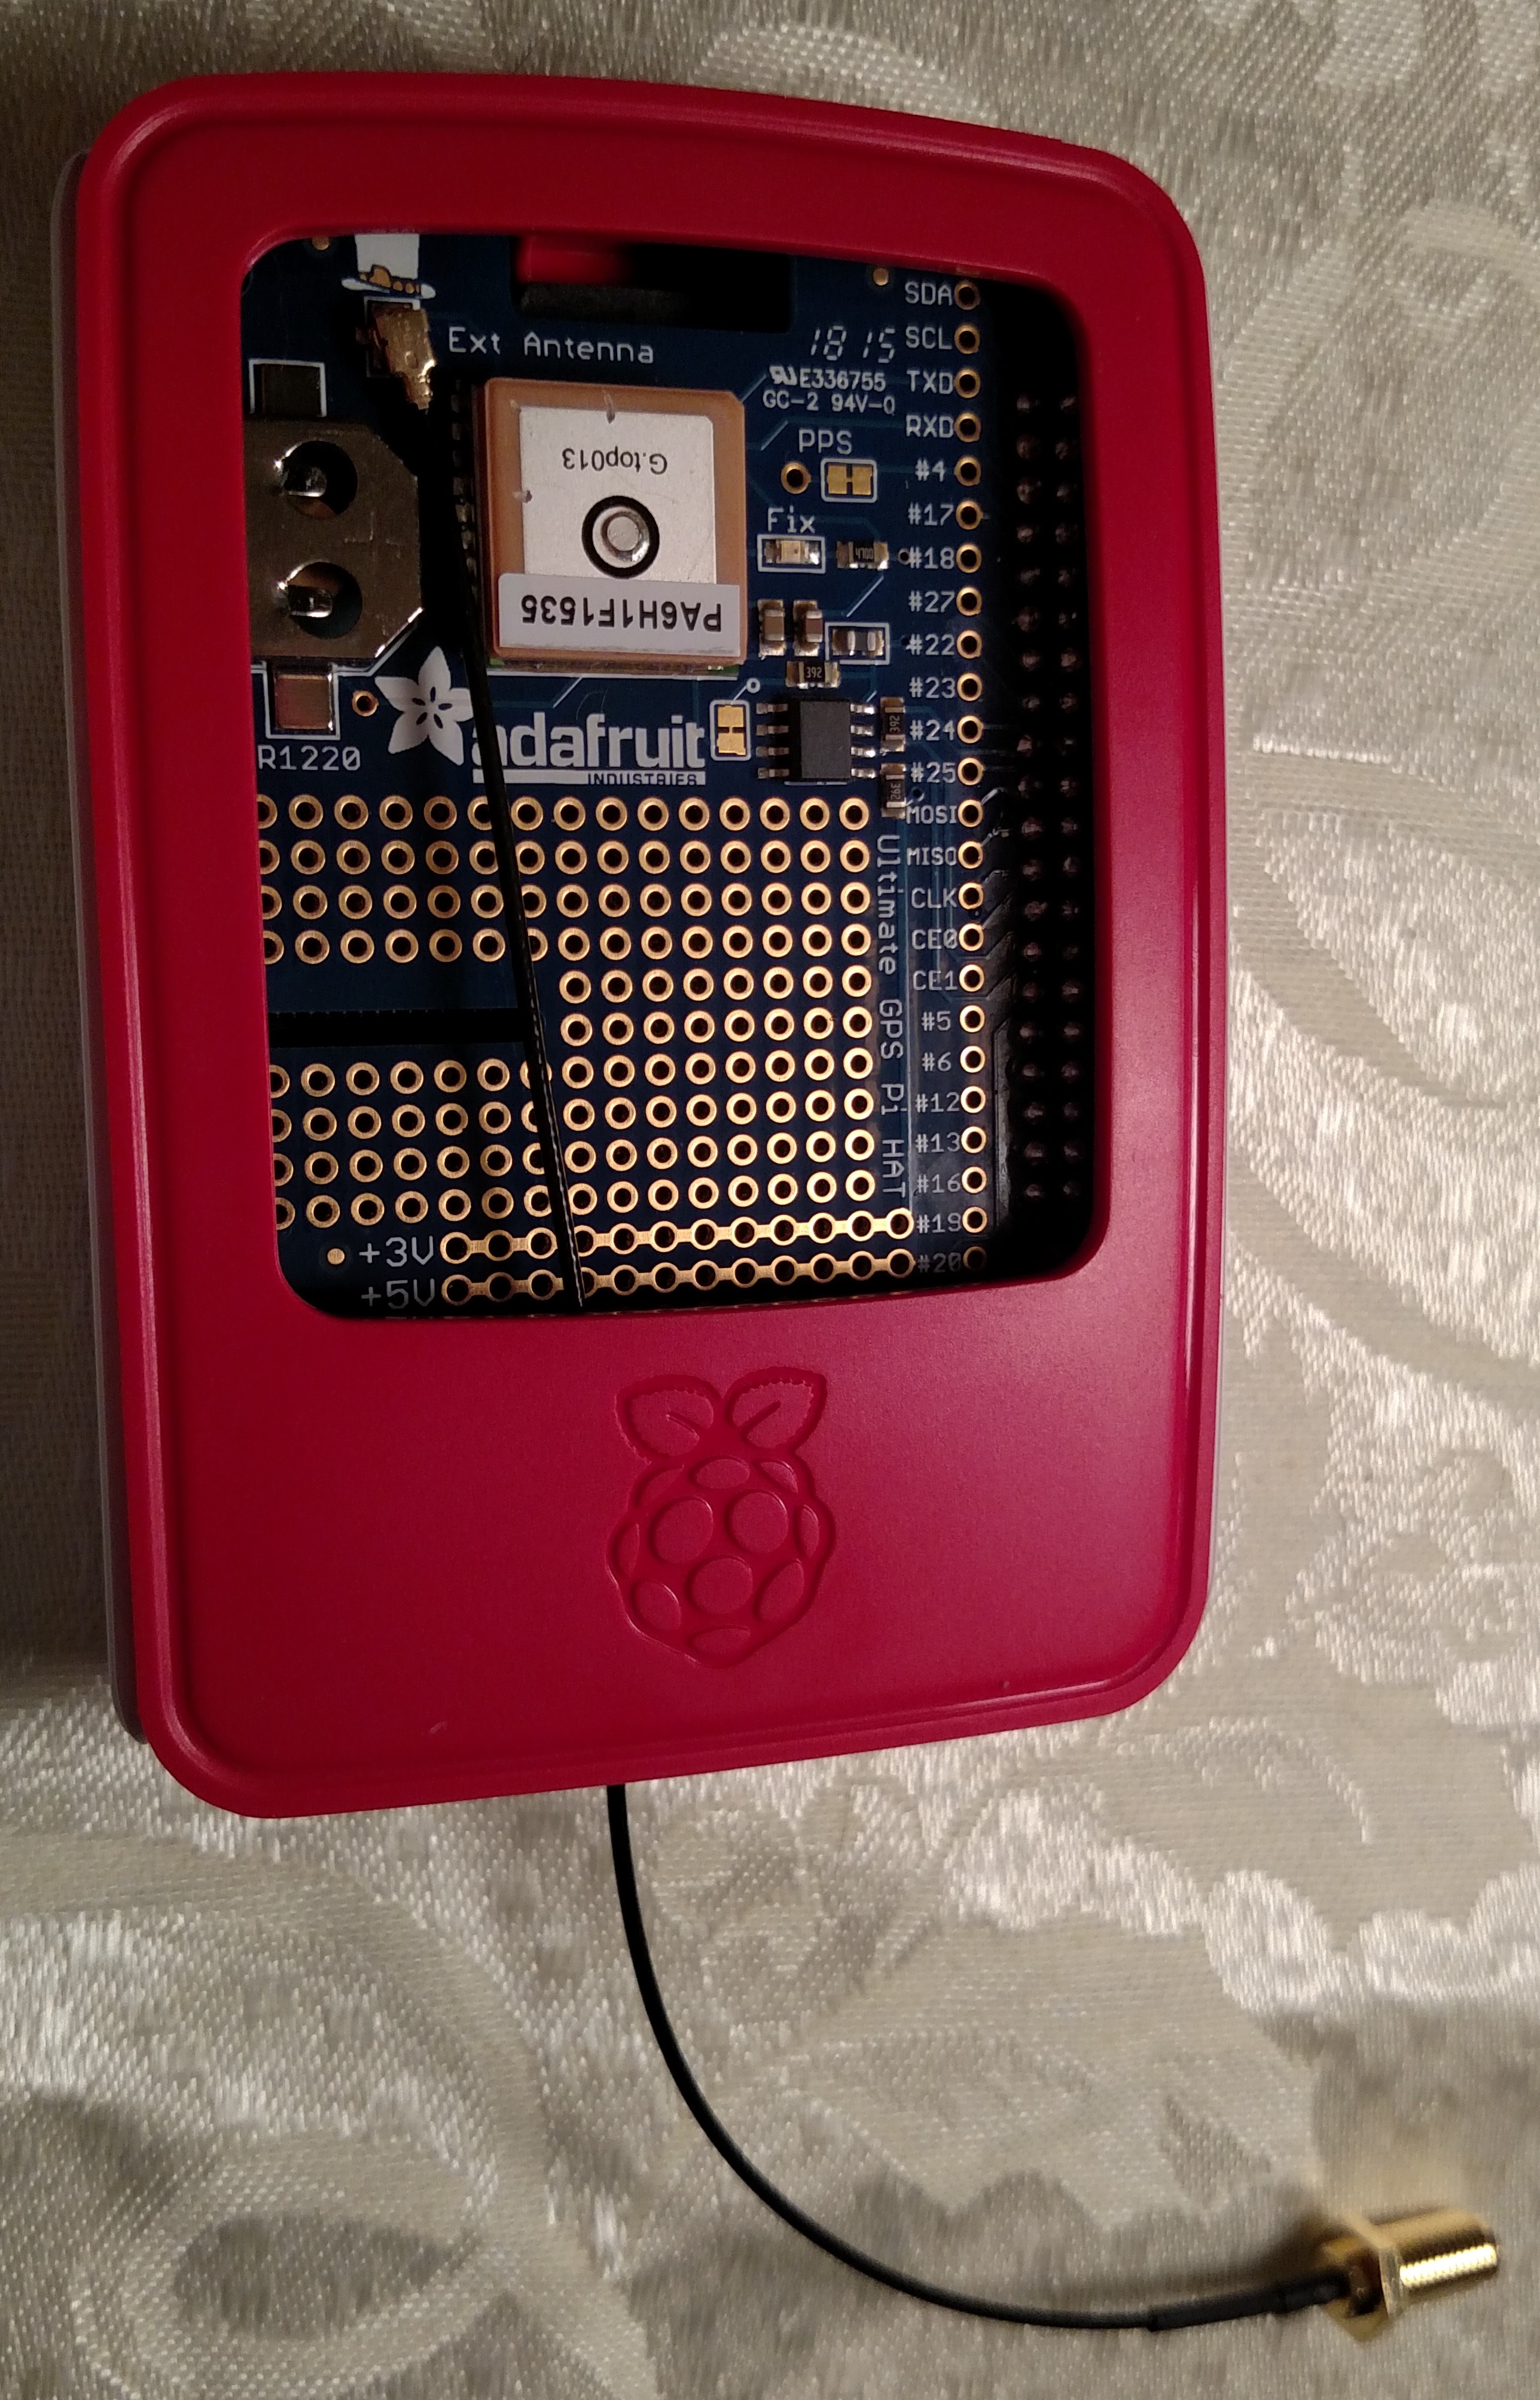
Besides that, there was not much thought that went into the construction of the build. I used the simple Official Red & White Raspberry Pi case that was not designed with the external GPS antenna in mind, so I had to let the RF adapter cable exit the case between the USB ports. While this worked, it was not “pretty,” and it provided no support, so any tension on the adapter cable went directly to the u.FL connector on the Ultimate GPS HAT, risking potential damage. I had also made the mistake of purchasing an RP-SMA to u.FL cable rather than a SMA to u.FL cable , which required me to get an additional RP-SMA to SMA adapter between the Raspberry Pi and the external GPS antenna .
So I wanted to come up with something more purpose-built and look more like an appliance ready for future use. I found that Adafruit had a great enclosure kit that had the holes perfect for the RF adapter jack to be secured and looked how I thought an appliance box should. So I started the new build project with the purchase of the enclosure kit . Since I already had the Raspberry Pi board and the microSD card, I did not need to purchase those, but if not, I could have gotten a new Raspberry Pi 3 . I had been making use of an old phone USB charging adapter to power my Raspberry Pi, with the new enclosure, I went ahead and purchased a 5V power supply as I had begun noticing that I was getting under-voltage messages in the logs.
While I purchased a new Ultimate GPS HAT due to my displeasure with the solder work and I had found that Adafruit now had a solderless header option with a jig kit . The Ultimate GPS HAT does come with a 2x20 header that requires soldering, and the solderless jig kit does include a 2x20 solderless header, so I got the kit, and if I build another box later, I can get another header and reuse the jig. The final missing part to polish the finished product was getting a nylon screws and standoffs kit. I picked the black nylon standoffs rather than the white just for personal preference and availability, ensuring that the HAT and the Raspberry Pi are securely supported more than by the header alone.
Putting together the pieces
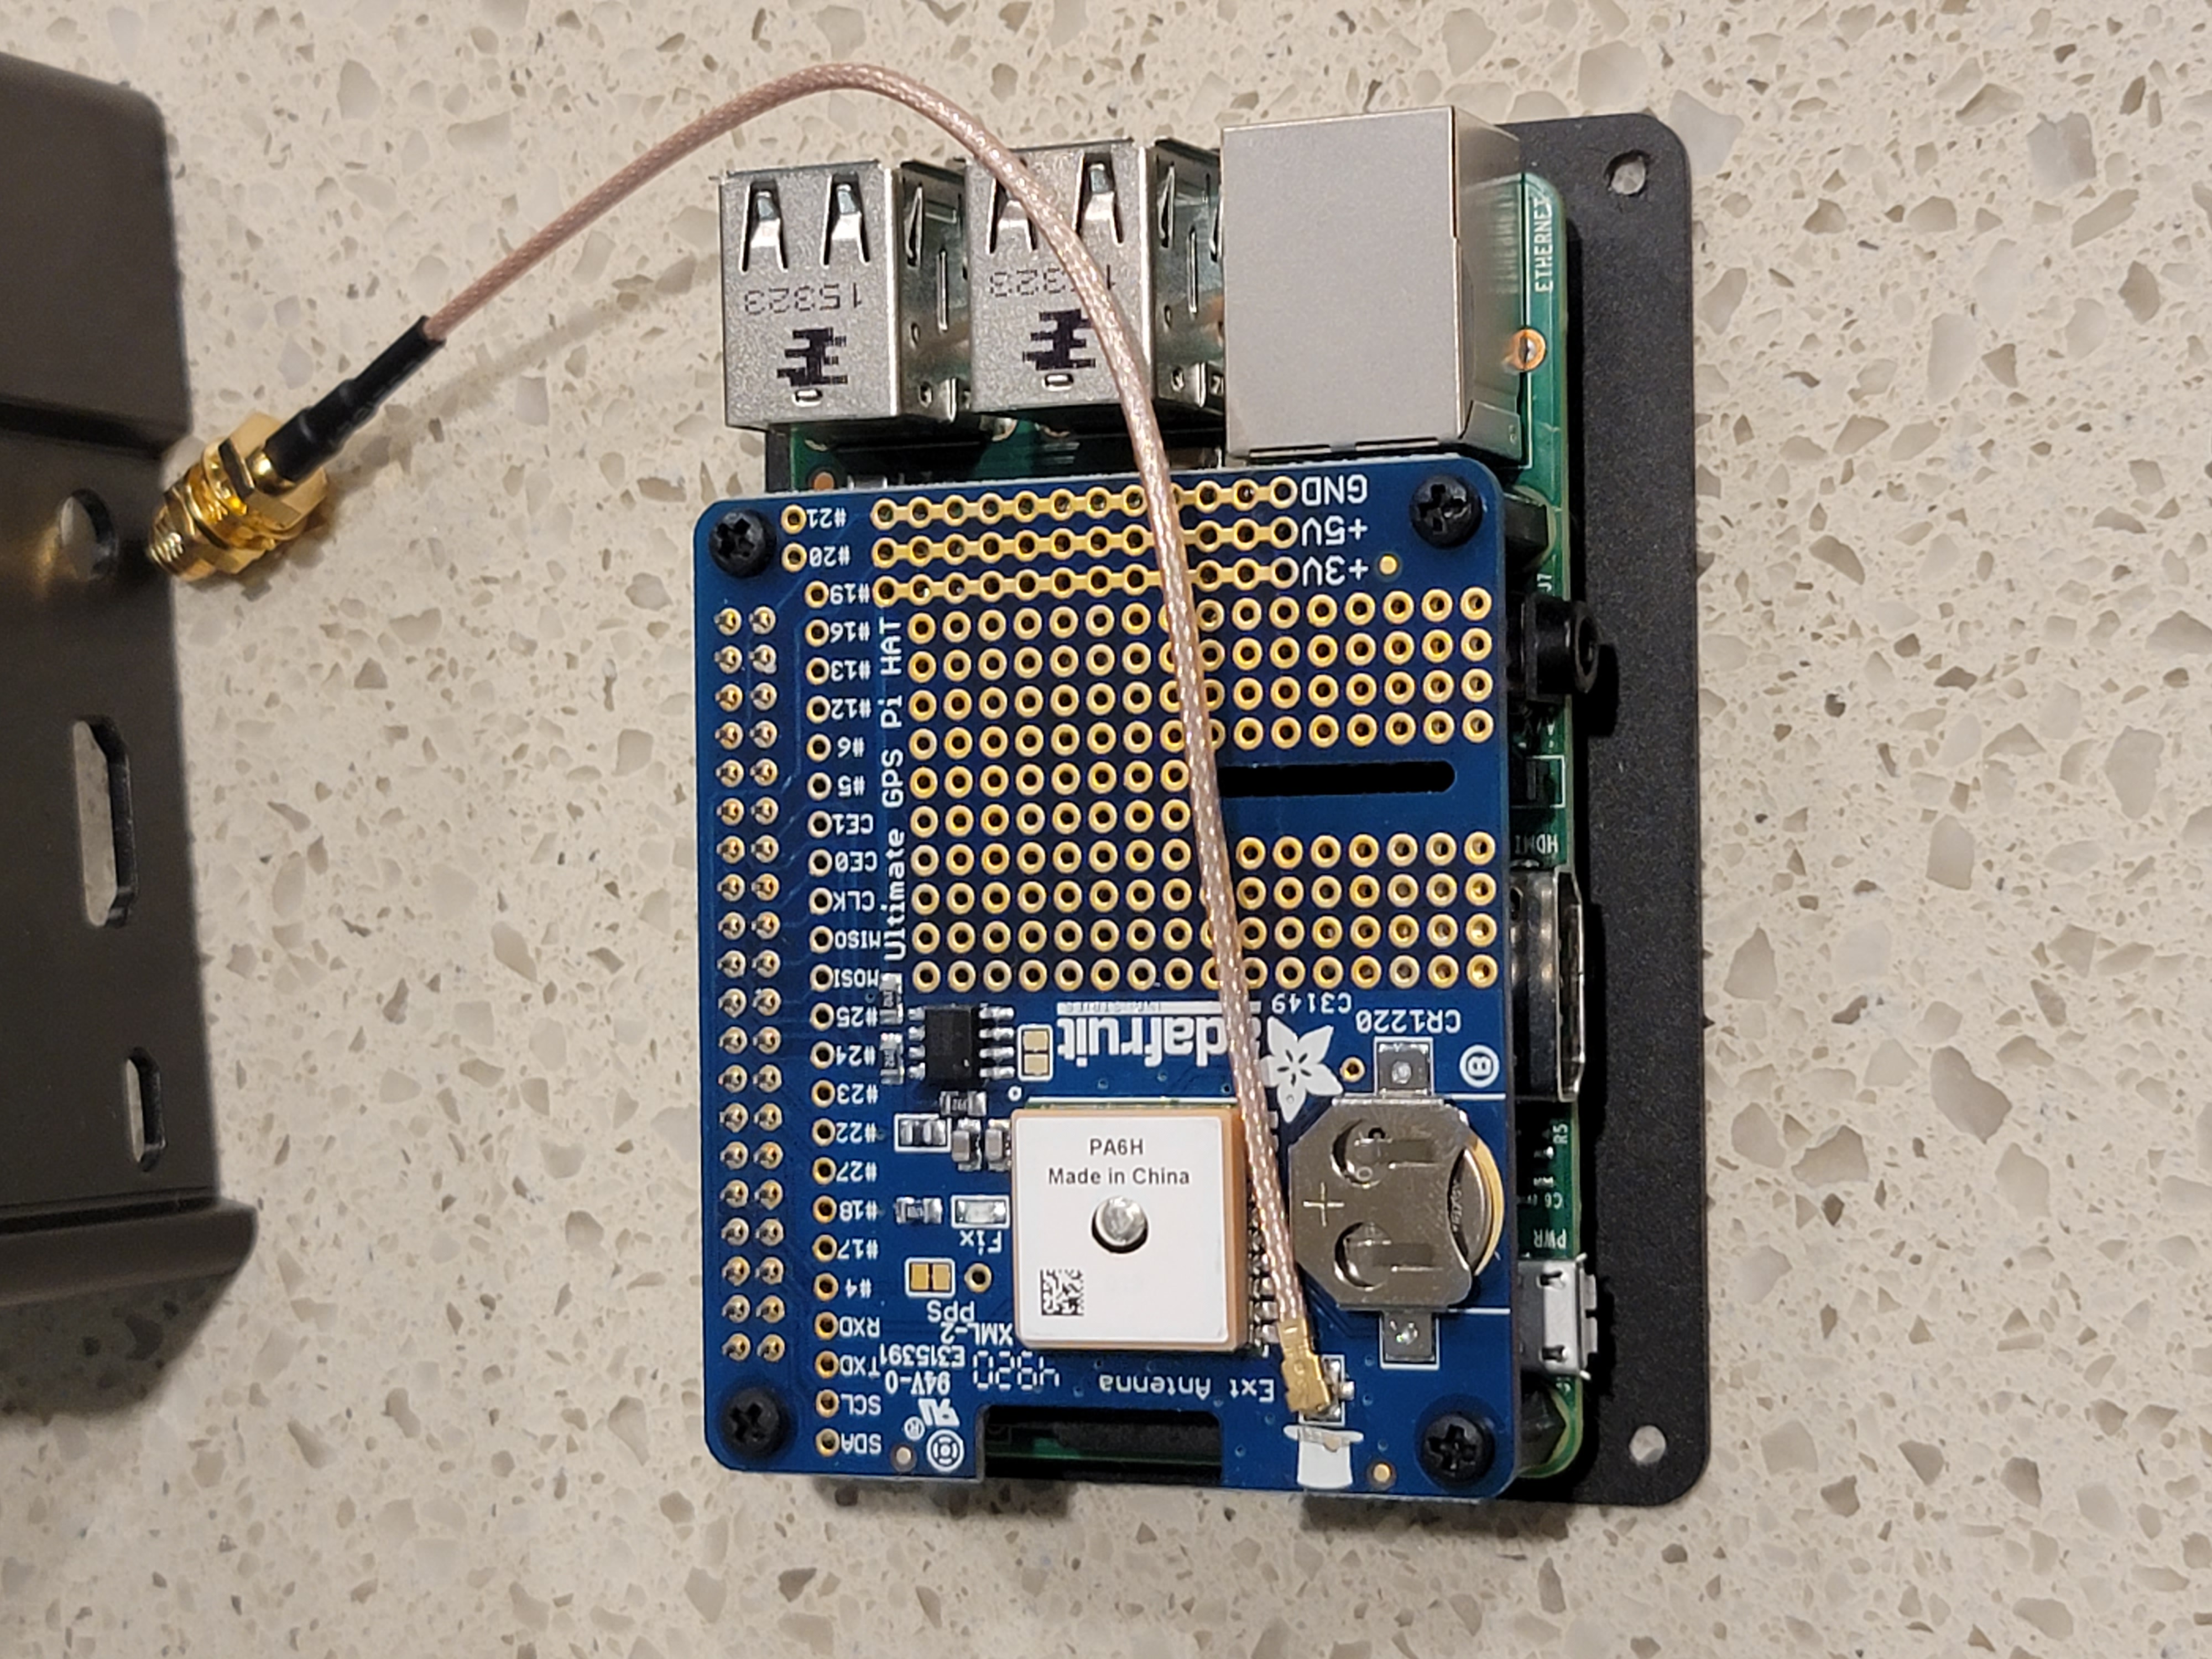 The first step in the new build was to take the Ultimate GPS HAT board and the 2x20
solderless header from the kit. Using the installation jig from the kit, I secured the
header and to the HAT. I then took four 12mm long M-F hex standoffs and 4 M2.5 x 4mm screws from the
screw and standoff kit to assemble the Raspberry Pi and Ultimate GPS HAT together to the
base plate of the enclosure kit . With the boards secured to the base plate, I just needed to
attach the RF adapter cable to the u.FL connector on the HAT to complete the assembly.
The first step in the new build was to take the Ultimate GPS HAT board and the 2x20
solderless header from the kit. Using the installation jig from the kit, I secured the
header and to the HAT. I then took four 12mm long M-F hex standoffs and 4 M2.5 x 4mm screws from the
screw and standoff kit to assemble the Raspberry Pi and Ultimate GPS HAT together to the
base plate of the enclosure kit . With the boards secured to the base plate, I just needed to
attach the RF adapter cable to the u.FL connector on the HAT to complete the assembly.
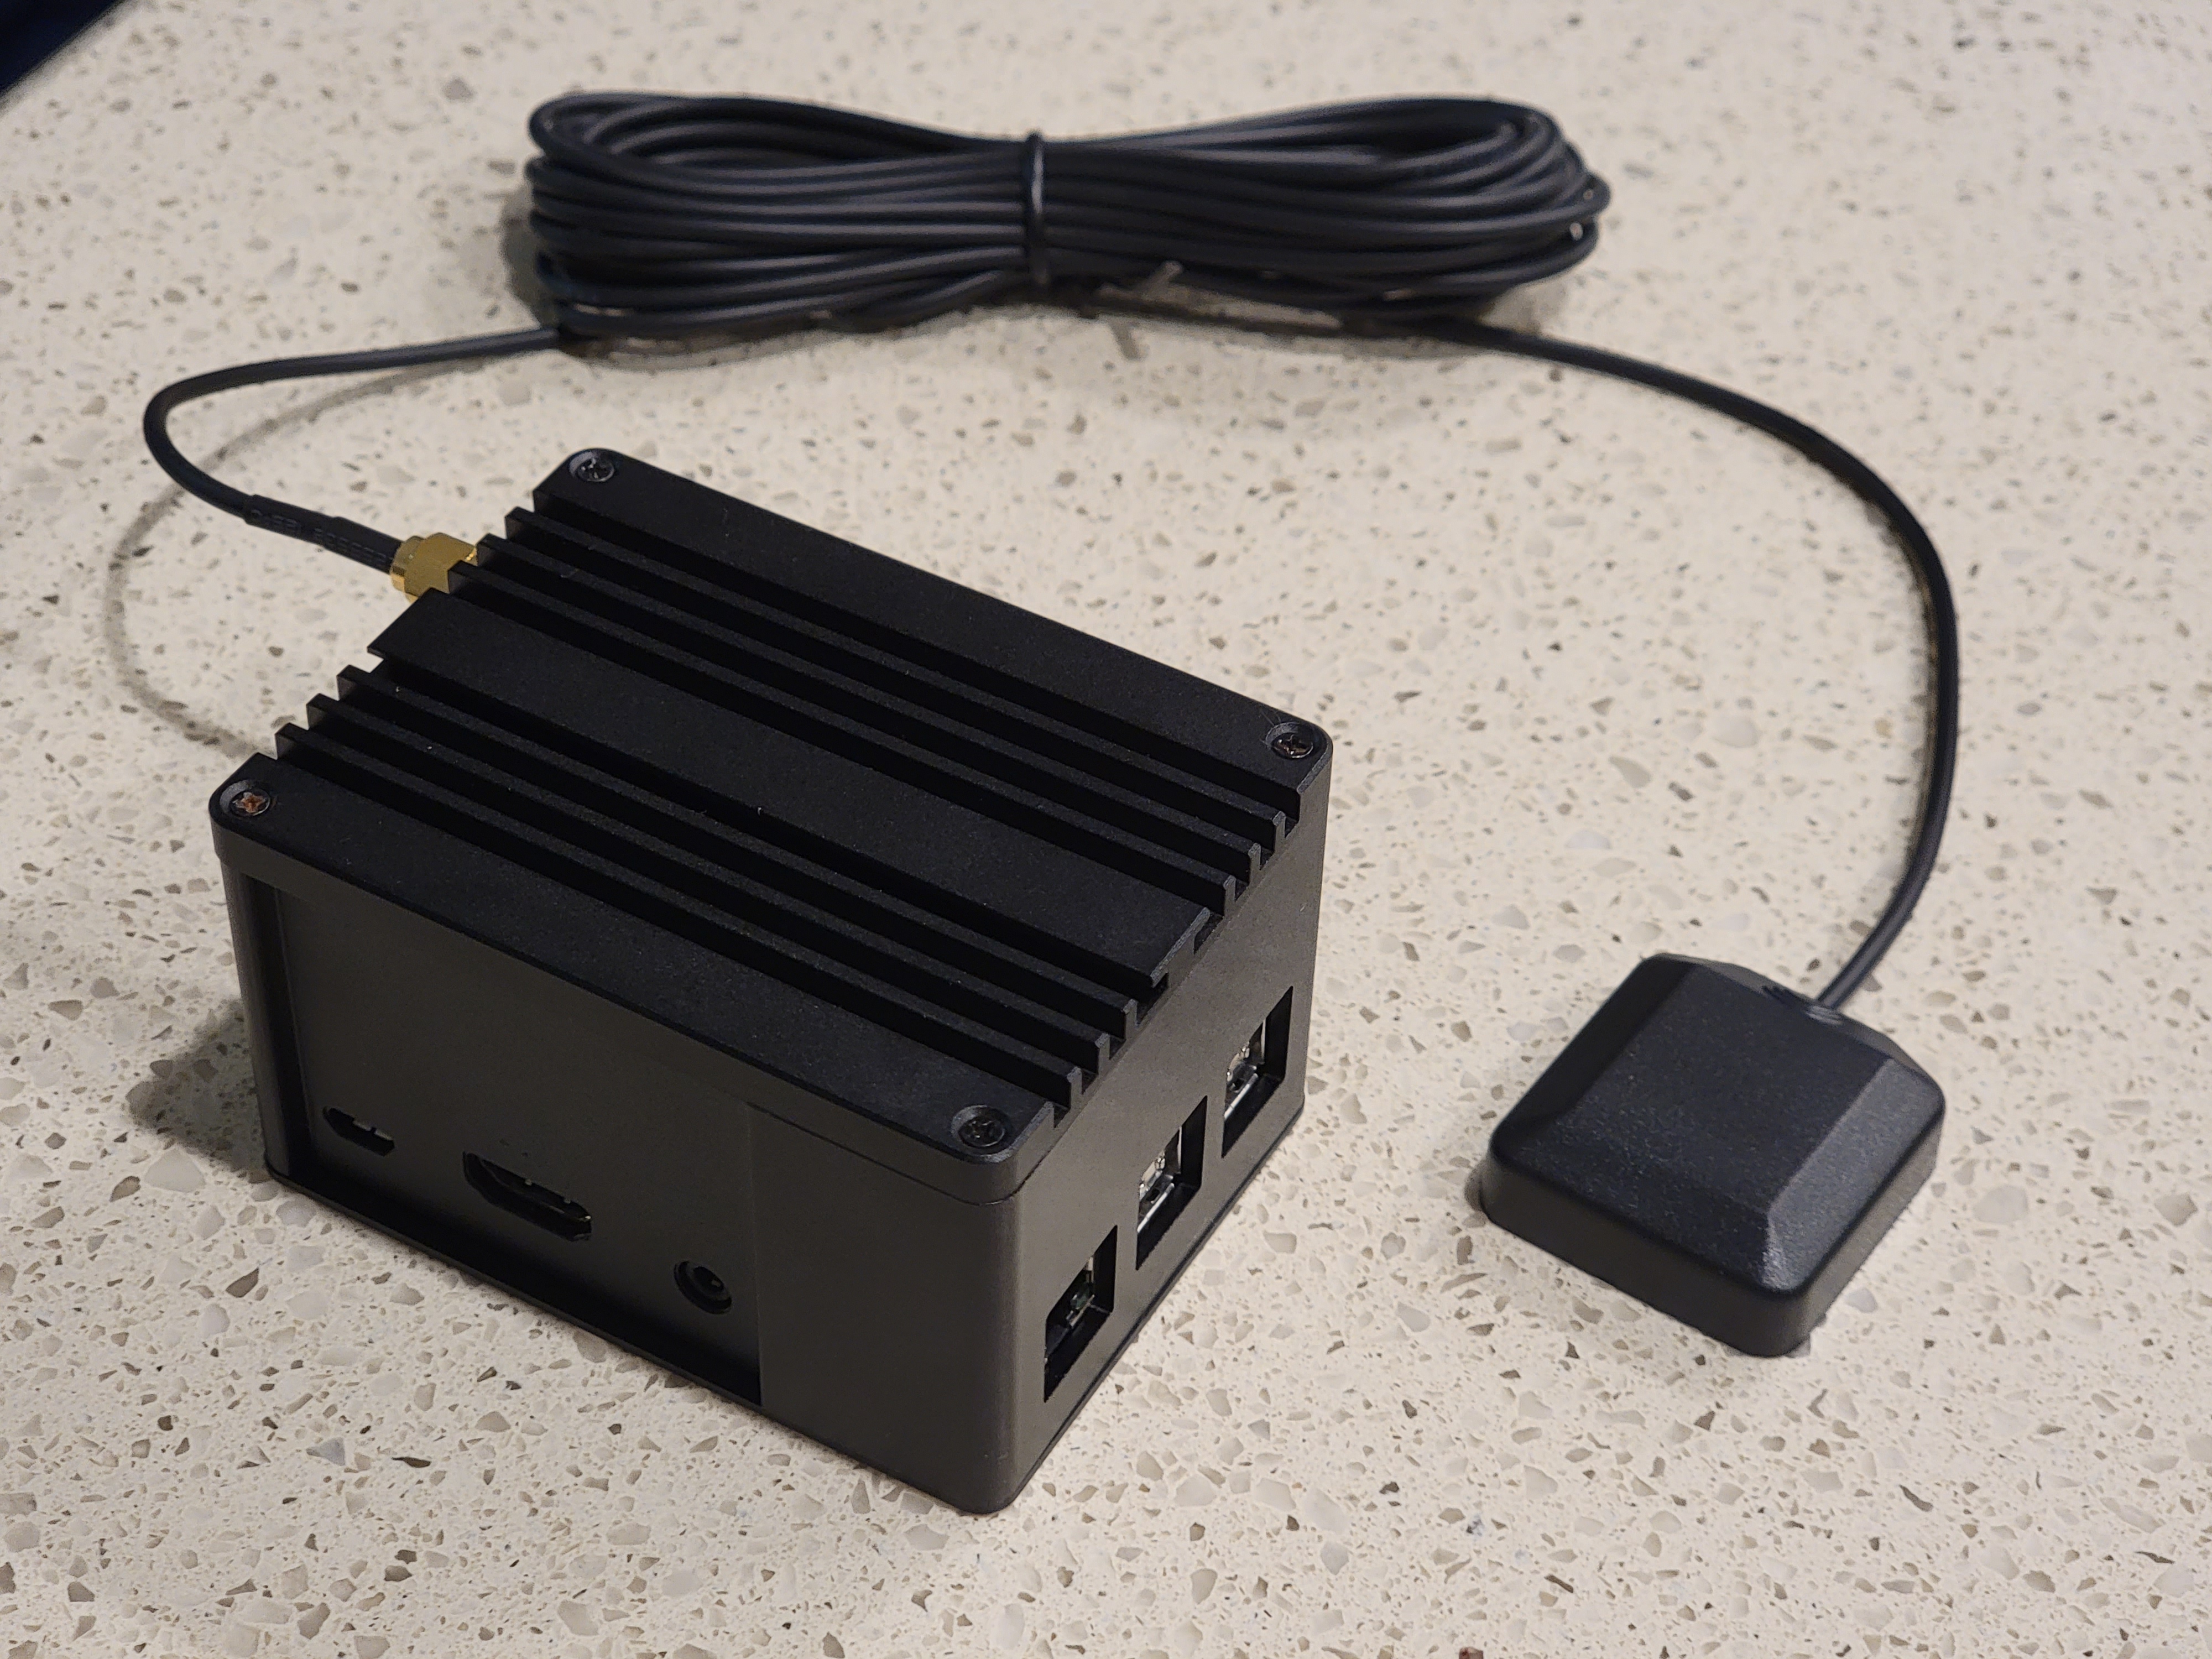
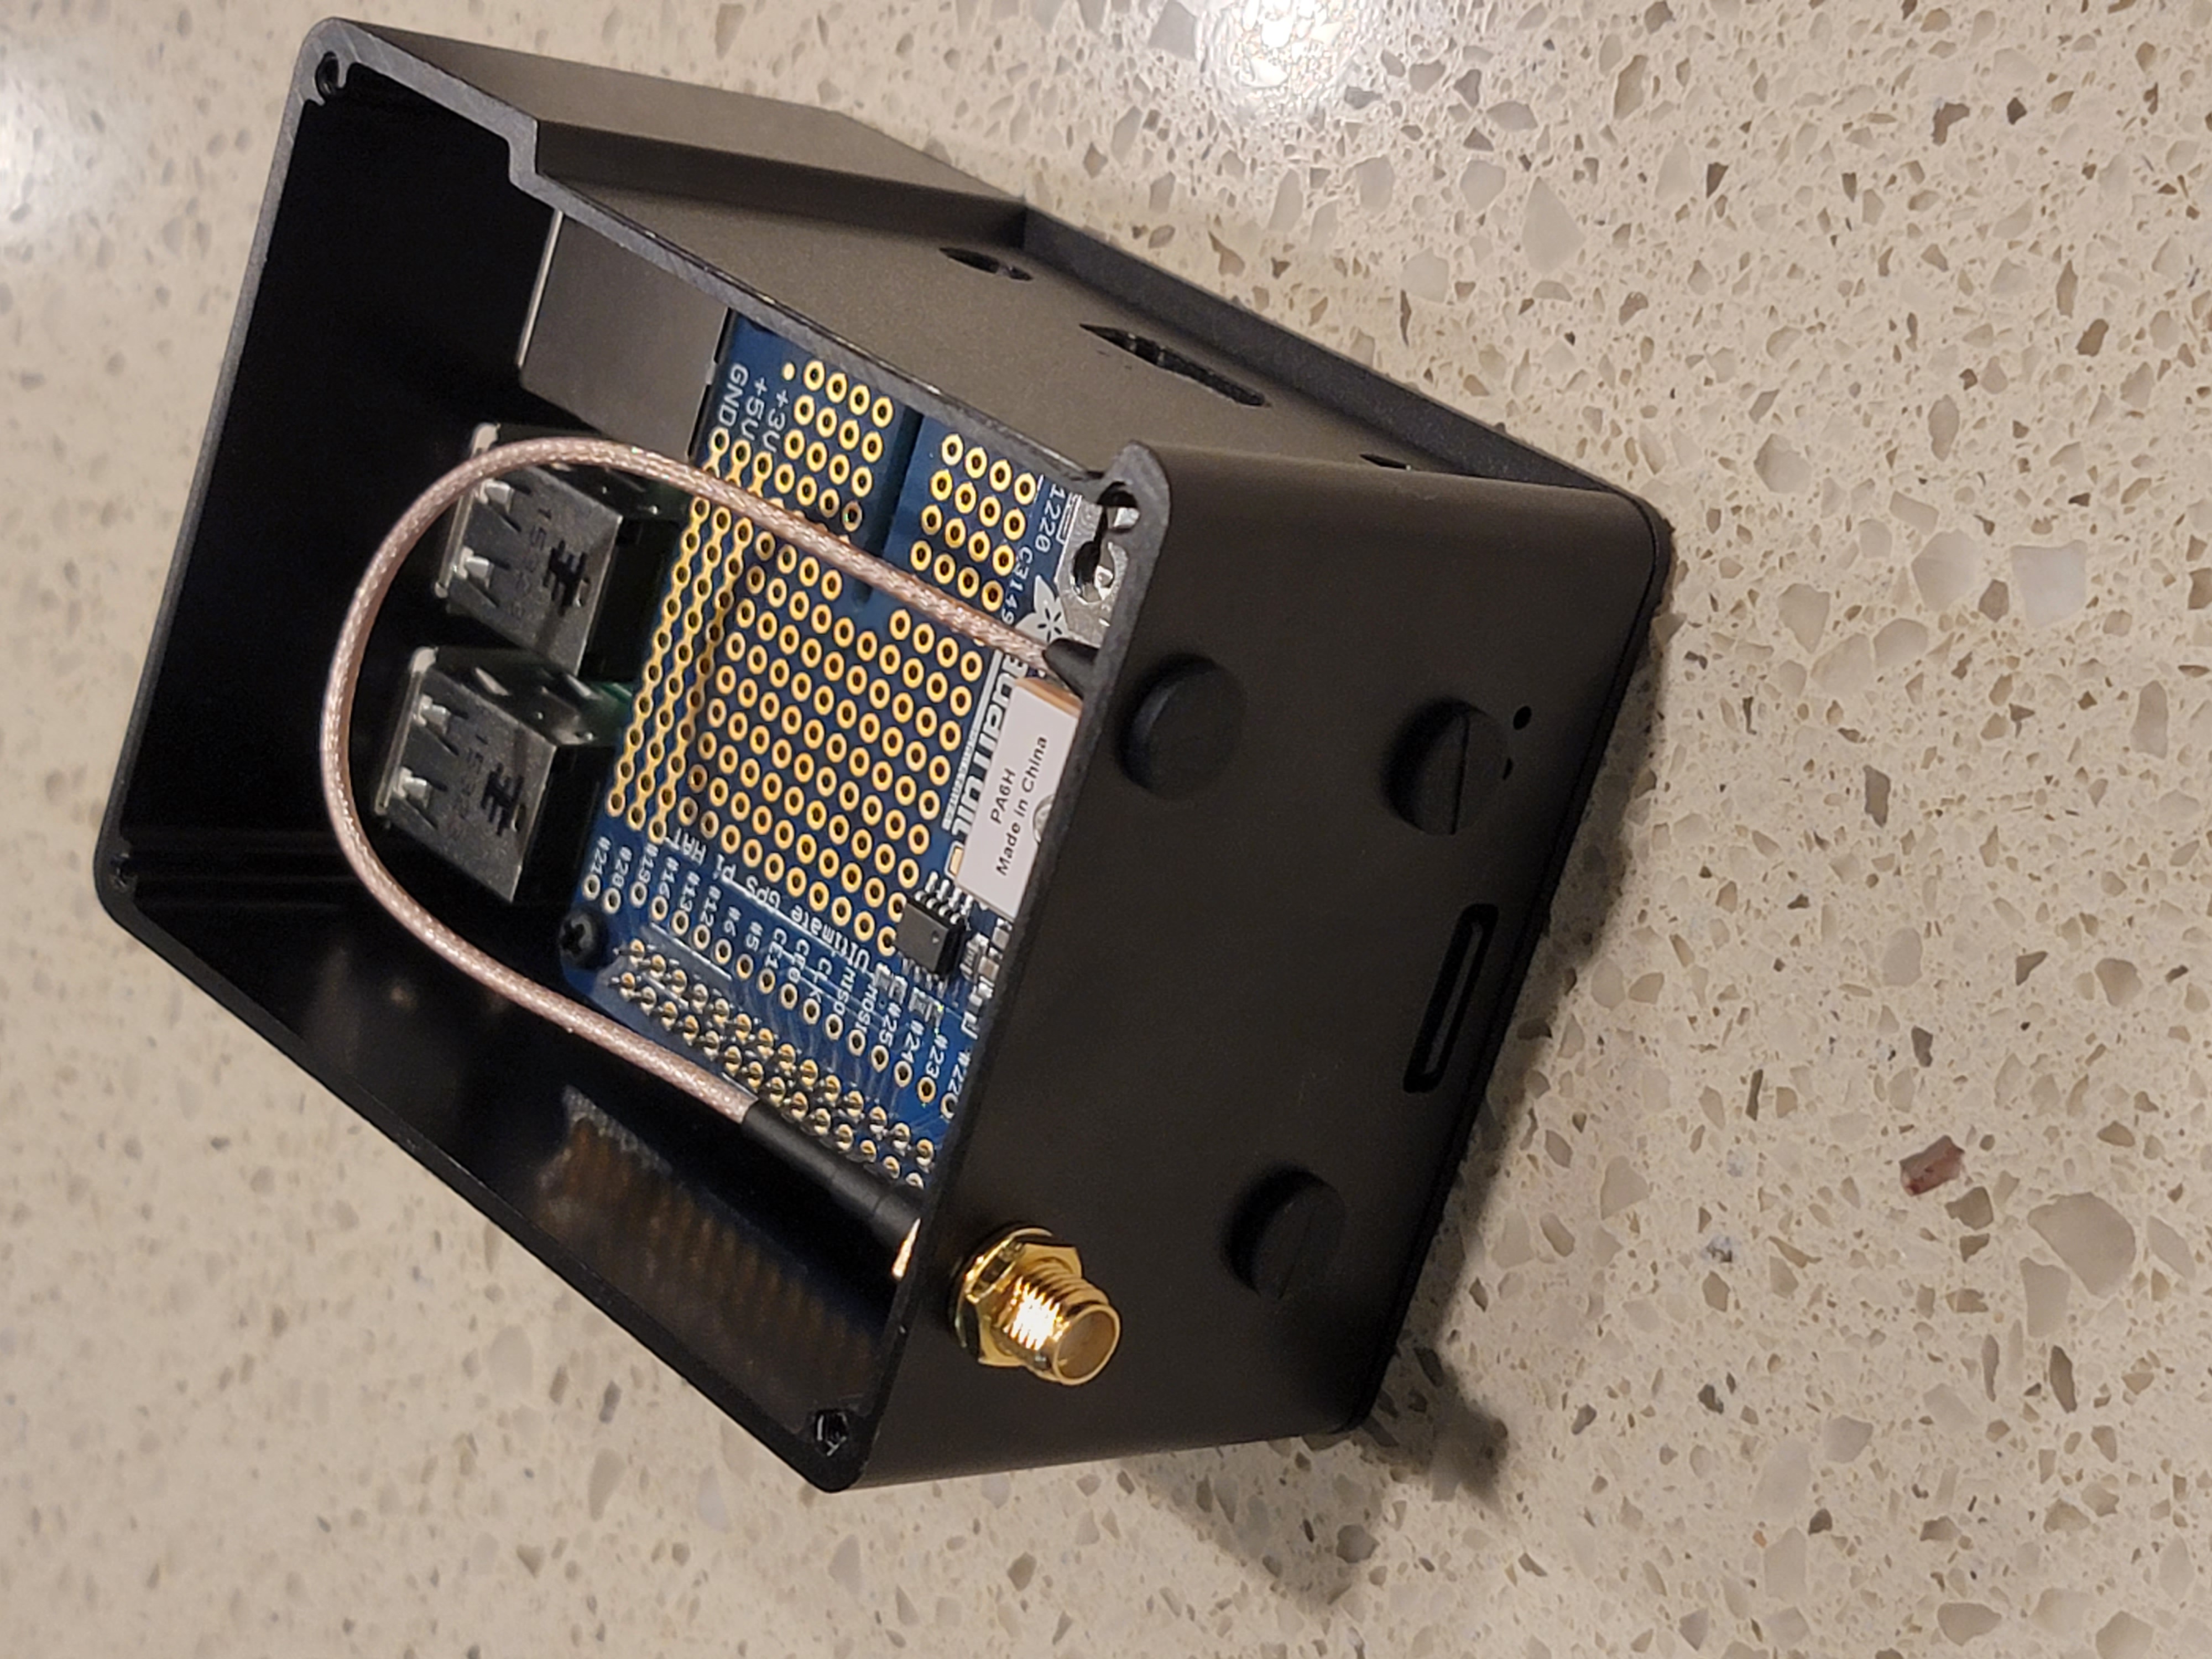 The enclosure then slides over the base plate assembly and the RF adapter cable jack is secured
through the top left hole. The enclosure kit includes several rubber plugs to fill the other three holes
that were not used to help keep dust out of the enclosure. Securing the top of the case
on the enclosure completes the build. With the hardware fully assembled, it was time to move on to
the software phase of the build.
The enclosure then slides over the base plate assembly and the RF adapter cable jack is secured
through the top left hole. The enclosure kit includes several rubber plugs to fill the other three holes
that were not used to help keep dust out of the enclosure. Securing the top of the case
on the enclosure completes the build. With the hardware fully assembled, it was time to move on to
the software phase of the build.
The first step in the software phase was to install the Raspberry Pi OS on the microSD card. The easiest way to perform this is with the Raspberry Pi Imager application, which will automatically download the image and write it to the microSD card, then verify it. The new version 1.6 has recently added an advanced configuration option available by hitting CTRL+Shift+X, which allows you to set the hostname, password, enable SSH, and configure wifi to assist in being able to bring the Raspberry Pi online and ready to be configured remotely without having to have a monitor and keyboard.
Ready for some Pi?
So there are plenty of Raspberry Pi install guides out there, so I will not go deep into how to perform
the initial install. You need to be able to access the command line, so if you do not enable SSH
before bootstrapping, you will need a monitor and keyboard to perform the initial installation.
It does not matter if you use wifi or ethernet, though an ethernet connection will most likely
be a more stable connection. As for the Raspberry Pi OS, I choose to use the Raspberry Pi Lite
over the Raspberry Pi Full or Desktop. The reasoning for this was to install the smallest
footprint possible from a security standpoint and just not want to install an unnecessary desktop
environment.
Once the Raspberry Pi has bootstrapped and is running, the first thing you want to do is edit the
/boot/config.txt. You want to comment out the line to disable audio as shown below on line 57.
Next you want to add the dtoverlay for pi3-disable-bt and pps-gpio as shown below on lines 59-60.
The GPIO used on the Ultimate GPS HAT is Pin 4; this needs to be included as it is not the default for the pps-gpio overlay. The enable_uart=1 on line 61 enables the GPIO serial port to use
/dev/ttyAMA0 (uart) rather than /dev/ttyS0 (mini uart). The gpu_mem=0 on line 62 can provide
some memory optimization leaving more RAM for the system if you run headless.
| |
The other system-level configuration is to edit the /boot/cmdline.txt and remove all
references to the serial console. This is because the Ultimate GPS HAT will be using the serial
port to communicate. We also want to tell the kernel not to run tickless to reduce the jitter
and offset in NTP when using GPS PPS. You will generally see the /boot/cmdline.txt will
contain something that looks similar to the following:
console=serial0,115200 console=tty1 root=PARTUUID=cead1835-02 rootfstype=ext4 elevator=deadline fsck.repair=yes rootwaitWhich I then edited to look similar to:
console=tty1 root=PARTUUID=cead1835-02 rootfstype=ext4 elevator=deadline fsck.repair=yes rootwait plymouth.ignore-serial-consoles nhoz=off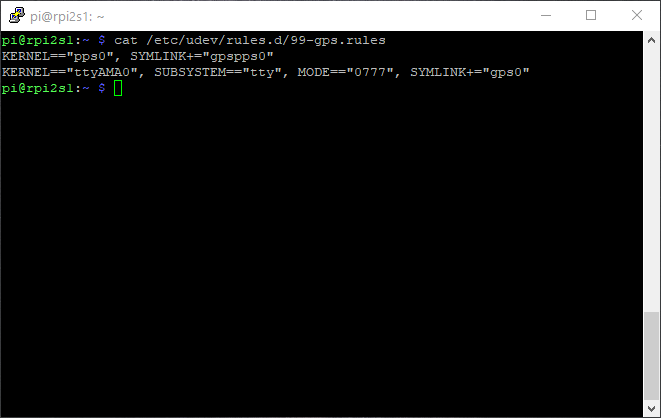
The next thing to get in place is the udev rule to set up the symlinks for our GPS device. Using
your favorite editor, you can create the /etc/udev/rules.d/99-gps.rules file with the following:
| |
Now we can move to install the actual software. Thankfully this is all available through the
software repository and able to use apt to install it. It is generally a good idea to make sure
you have everything up to date as well, so here are the commands I executed:
sudo apt update
sudo apt upgrade
sudo apt install pps-tools setserial ntp ntpdate
We also want to help speed up the boot time so let us disable and mask the serial console related systemd service units as they are not needed.
sudo systemctl disable hciuart
sudo systemctl mask hciuart
sudo systemctl disable serial-getty@ttyAMA0.service
sudo systemctl mask serial-getty@ttyAMA0.service
Another item is to disable the restarting of NTP by the DHCP client. The easist way to perform this is to simply remove those files so you want to execute the following:
sudo rm /etc/dhcp/dhclient-exit-hooks.d/ntp
sudo rm /var/lib/ntp/ntp.conf.dhcp
sudo rm /lib/dhcpcd/dhcpcd-hooks/50-ntp.conf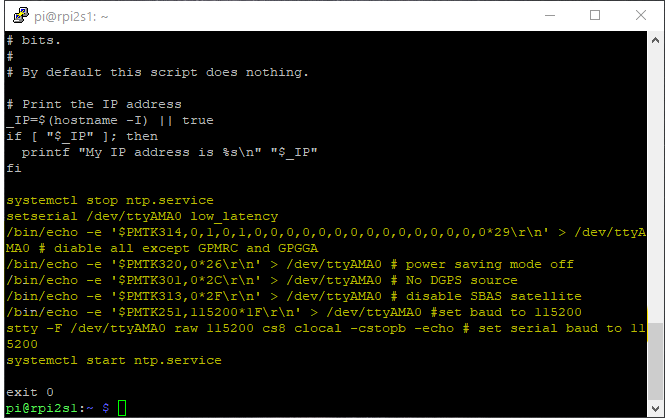
The last piece we want to set up is performing the initial serial communication settings with the
GPS, so we will open up the /etc/rc.local in our editor and add the highlight lines 20-28.
| |
At this point, it is a good idea to give your Raspberry Pi a reboot to enable it to start up with this configuration in place. We do not yet have NTP configured to use the GPS input, but restarting now will bring everything up with the hardware configured, and we should be ready to configure NTP.
The time is nigh
When our Raspberry Pi has come back online after being restarted, and we have connected back to
it, either via monitor and keyboard or over SSH, we will want to confirm that things are working.
The first is to make sure that the PPS device is responding. We will do this using the ppstest utility
we installed earlier.
pi@raspberrypi:~ $ sudo ppstest /dev/pps0
trying PPS source "/dev/pps0"
found PPS source "/dev/pps0"
ok, found 1 source(s), now start fetching data...
source 0 - assert 1618365982.999996770, sequence: 2337 - clear  0.000000000, sequence: 0
source 0 - assert 1618365983.999994313, sequence: 2338 - clear  0.000000000, sequence: 0
source 0 - assert 1618365984.999994148, sequence: 2339 - clear  0.000000000, sequence: 0
source 0 - assert 1618365985.999993720, sequence: 2340 - clear  0.000000000, sequence: 0
You can hit CTRL+C to cancel this after confirming it works. If you get a Time out message, then
your GPS has most likely not locked on to the satellites yet, so you need to attempt repositioning
your antenna to have better access to the sky.
Next, we can confirm we are getting the GPS data. You can do this very quickly using cat.
pi@raspberrypi:~ $ cat /dev/gps0
$GPGGA,021742.000,2810.6866,N,08124.9390,W,1,11,0.83,16.4,M,-30.6,M,,*65
$GPGSA,A,3,12,06,23,15,02,13,05,25,29,18,20,,1.44,0.83,1.17*0D
$GPRMC,021742.000,A,2810.6866,N,08124.9390,W,0.02,49.30,140421,,,A*49
$GPVTG,49.30,T,,M,0.02,N,0.04,K,A*05
$GPGGA,021743.000,2810.6866,N,08124.9390,W,1,11,0.83,16.4,M,-30.6,M,,*64
$GPGSA,A,3,12,06,23,15,02,13,05,25,29,18,20,,1.44,0.83,1.18*02
$GPRMC,021743.000,A,2810.6866,N,08124.9390,W,0.03,223.42,140421,,,A*72
$GPVTG,223.42,T,,M,0.03,N,0.05,K,A*3E
The lines we are looking for most are the $GPGGA and $GPRMC prefixed ones that I have
highlighted. The lines are comma-delimited, and the $GPGGA line will indicate how many
satellites you are locked onto in the 8th column. In this example, we are locked on 11
satellites, and I typically find my system is locked on anywhere from 6-13 satellites with
9-11 as an average. If you are curious to understand these lines, I found a great site
that you can paste the string into and see what it is telling you.
If you are getting positive results, it is finally time to tie it all together and get NTP using this data. At this point, by default, your NTP server will be running and using external NTP pool servers to get peered.
At this point, we need to edit the /etc/ntp.conf file. Below you will find the configuration
I have in place, and I have highlighted the essential lines you will need to modify or add
if missing from your own.
While getting things initially set up you may wish to uncomment line 9 to allow NTP to record
the statistics. In particular, the clockstats will be very helpful to confirm that NTP is
receiving the GPS data. I would, however, probably turn this off once confident in the setup
as this would add additional writes to the MicroSD card, which can lower the usefulness of the
drive and fill up the space if you do not monitor it.
| |
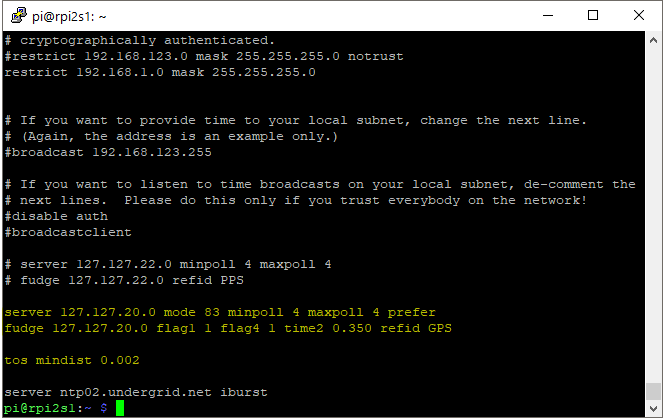
On line 46, I include the limited kod options to add more security to the configuration and
limit the changes that can be made from the peer servers.
Lines 62-63 are where we add the GPS as our reference clock source. The 127.127.20.0
address is the internal address for the GPS_NMEA reference clock and will point to the
/dev/gps0 and /dev/gpspps0 devices from our udev rules. The mode we set on line 62 tells NTP
that we are looking to process $GPRMC and $GPGGA data lines only, and we are communicating
at 115200 baud over the serial port. The flag1 setting on line 63 signals that we want to
enable PPS signal processing. The flag4 setting obscures the GPS location, which would be
stored in the clockstats statistics file and is not needed to operate. The time2 setting
is the serial EOL offset and seems fine for Raspberry Pi serial communications. The tos
command on line 65 is to set the minimum distance used but the selection and anticlockhop
algorithm. Setting this to 0.002 is just slightly more than the default of 0.001, which seems
to work excellent with the PPS signal on the Ultimate GPS HAT.
With the ntp.conf configuration saved, you should be ready to restart the NTP service, and after
given a bit of time to stabilize you should be able to query the NTP server and see that it is
using the GPS data.
sudo systemctl restart ntp.service
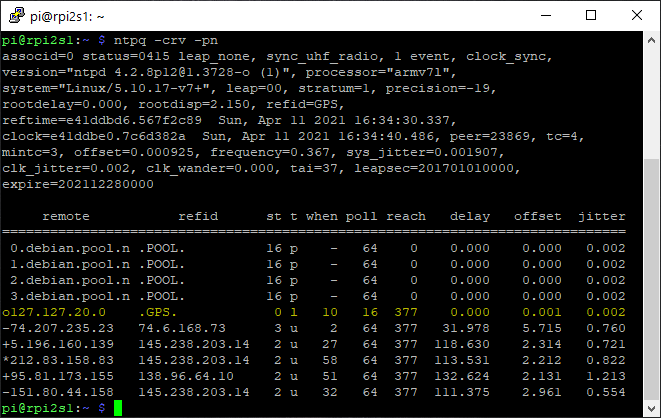
ntpq -crv -pnIf everything is working correctly, you expect to see refid=GPS and stratum=1 in the
ntpq output. You are also looking to see an o to the left of the 127.127.20.0 peer
entry with the delay, offset, and jitter column values as close to 0.000 as possible.
This will indicate that your time is stable. A reach column value of 377 indicates that there have been no polling attempt failures.
That’s a wrap
At this point, you will have successfully set up your stratum-1 NTP time server and can begin to
point all your servers and workstations to it to receive time updates. This is where
I would give one last reboot test and bounce the server to ensure that everything comes back
up as expected. I always say it is not done unless it has been rebooted. So give it one more reboot and double-check that everything comes up correctly.
All in all, I think that the total cost for this NTP server project build was around $150-160, which includes the extras that can be used with future projects. While the case and everything makes mention of a Raspberry Pi 3, I did reuse my existing Raspberry Pi 2, which does not include wifi and Bluetooth. My existing Raspberry Pi 3 board is already in use with another build project which is why I did not use it, and I did not think it worth buying a new one when this worked fine. The original Ultimate GPS HAT I bought did have a reported issue with the Raspberry Pi 3, but that appears to have been resolved and a new revision of the board released.
Overall I am pretty happy with how this project turned out, and the results have been highly more stable than my original build. I expect this device to see a long lifetime of use as I keep my timestamps accurate.